Magento
Vesta’s extensions for Magento add a payment form to your checkout page and makes the following Vesta services available as part of your Magento storefront, depending on your Vesta subscription:
- Fraud Protection - Adding Vesta’s fraud protection services to your eCommerce platform makes it easy to approve more safe transactions and reject only the transactions that are fraudulent.
- Payment Processing - If you use Vesta as your payment processor, our Magento extension enables accepting payments using Vesta and all of the additional benefits that come with our payment processing service.
Vesta offers two different extensions for Magento. Be sure to install the correct extension depending on your Vesta subscription:
- Guarantee - The Guarantee extension adds Vesta’s fraud protection services to your Magento storefront. It is available for all Vesta subscribers who use the Magento eCommerce platform.
- Guarantee + Processing - The Guarantee + Processing extension adds Vesta’s fraud protection services and makes it possible to use Vesta as your payment processor. It is available for Vesta Acquiring subscribers.
Installment Payments
For customers in Latin America, our Guarantee + Processing extension for Magento now adds fraud protection to Installment Payments. Installment payments come with unique risks. Eliminating installment payment-related fraud can lead to increased sales and decreased costs for your business.
If you are an existing Magento customer, and you want to add Vesta’s fraud protection services to your storefront, start by creating a Vesta account on our Partner Portal.
This page describes how the extensions work with your storefront and provides detailed installation instructions, which apply to both extensions. The Setup section defines the settings that you will enter in the Magento admin panel, which are unique to the Guarantee and Guarantee + Processing extensions.
How It Works
The Vesta extension for Magento storefronts allows you to accept credit and debit card payments on your Magento store by embedding a payment form on the Magento checkout page. When a customer places an order on your store, Vesta analyzes the transaction for indications of fraud and decides whether to submit the transaction for processing based on options that you set. The steps below describe the process in detail:
-
Your customer places items in their shopping cart and chooses to check out. Your Magento store displays the Vesta payment form along with the standard billing and shipping address fields.
-
Your customer enters their credit or debit card information and confirms the purchase. The transaction details are sent to Vesta along with behavioral and device details that were collected while your customer shopped.
-
Vesta analyses the data for indications of fraud and assigns the transaction a risk score.
-
If the risk score meets the criteria that you set, Vesta submits the transaction to your payment processor for approval, and your customer is notified that the purchase was successful.
If the transaction is too risky, Vesta rejects the transaction, and your customer is alerted that the purchase was not completed.
Details about the risk of each transaction submitted to your store and tools for handling chargeback claims will be available in the Vesta portal. See the Partner Portal page for more information. Information about your products and sales will still be available in your Magento dashboard.
To add the Vesta extension to your Magento store, visit the Magento marketplace to obtain the Vesta extension. Then, use the Composer package manager to update the dependencies in your Magento project. The Installation section of this page provides detailed instructions for adding the extension to your Magento site.
Before installing the extension, you will need locate details about your Vesta account, which you will enter in the Magento dashboard during Setup. Review the Requirements section for more information.
Requirements
To use the Magento extension you must have accounts with both Vesta and Magento, and you must have installed the Vesta extension on your Magento account. See the Installation section for details about installing the extension.
Vesta’s Magento plug-in is only certified to work with Magento Open Source v2.3.2.
You will need the look up following information in vPortal to set up the Magento extension in the Sandbox environment:
- Account Name - Your Vesta account name, which is available in the Vesta portal.
- Password - Your Vesta account password, which is available in the Vesta portal.
- API Base Path - The base path that your site will use to access Vesta’s API.
- Data Collector URL - The URL that will be used to send behavioral data to Vesta.
- Merchant Routing ID - A routing ID for submitting transactions for processing.
When you are ready to move your application to the production environment, your Vesta Onboarding Specialist will provide you with updated values for the Account Name, Password, and Merchant Routing ID. The production values for the API Basepath and Data Collector URL are available in vPortal.
You must also decide what level of fraud risk that you are willing to accept. In the Magento dashboard, you will define the highest level of risk that you are willing to accept based on the Vesta risk score. Vesta’s risk scores assess a transaction on a scale of 1 to 5, with 5 being the safest. In the Magento settings you can select one of the following options:
- Capture Low Risk Payments – You will only accept transactions with a risk score higher than 4.
- Capture Medium Risk Payments - You will accept transactions with a risk score of 3 or higher.
- Capture High Risk Payments – You will accept transactions with a risk score of 2 or higher.
See the Setup section that applies to your extension for details about where to enter the information defined above.
Installation
The steps below provide an overview of how to download and install the Vesta extensions for Magento starting from Vesta’s Partner Portal:
-
Navigate to the Extensions screen of the Partner Portal and click the “Setup Magento” button. You will be taken the Vesta Corporation page in the Magento Marketplace.

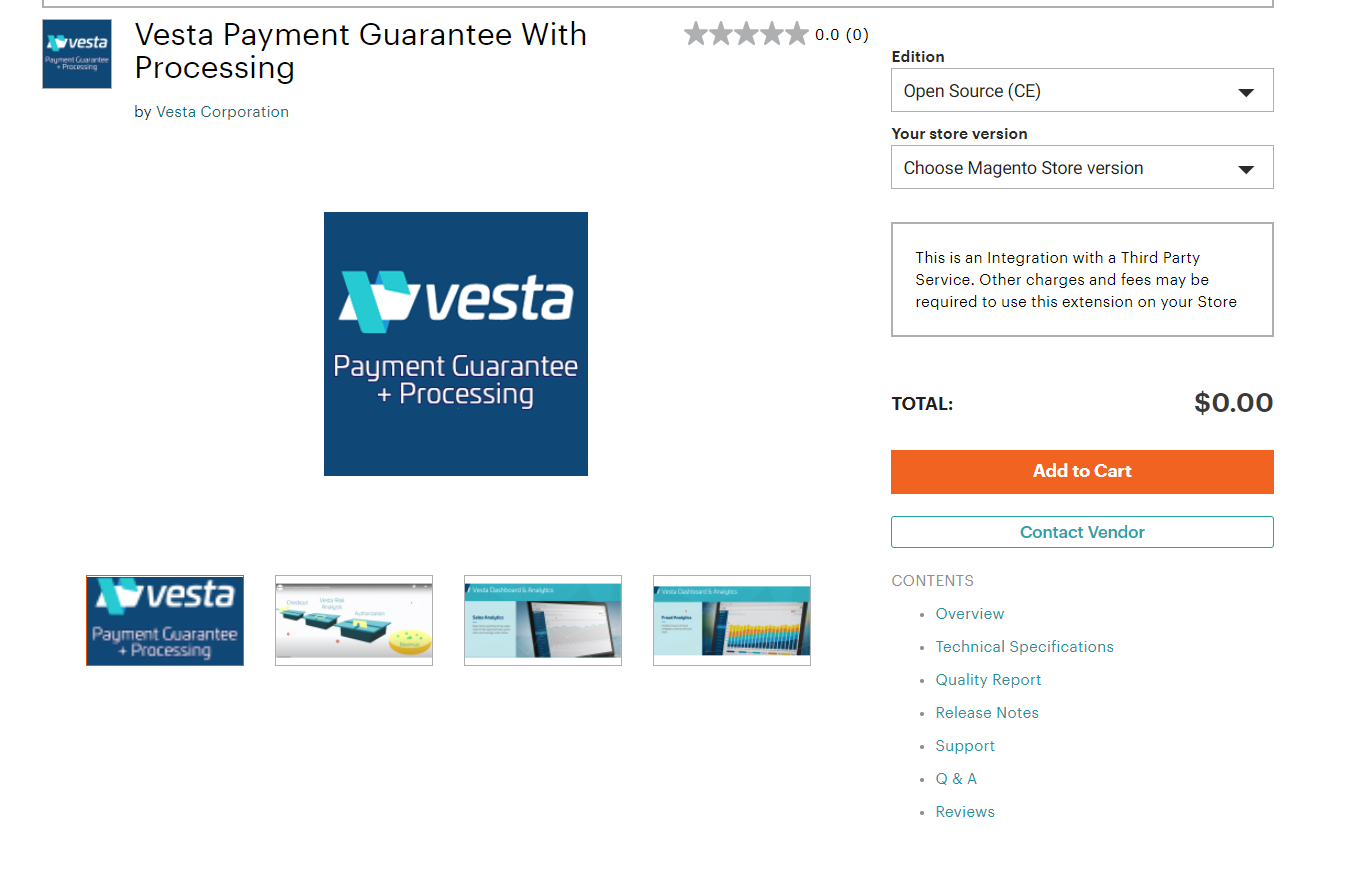
-
Click the correct option based on your Vesta subscription: Guarantee or Guarantee + Processing. The extension description page, shown below, will open:
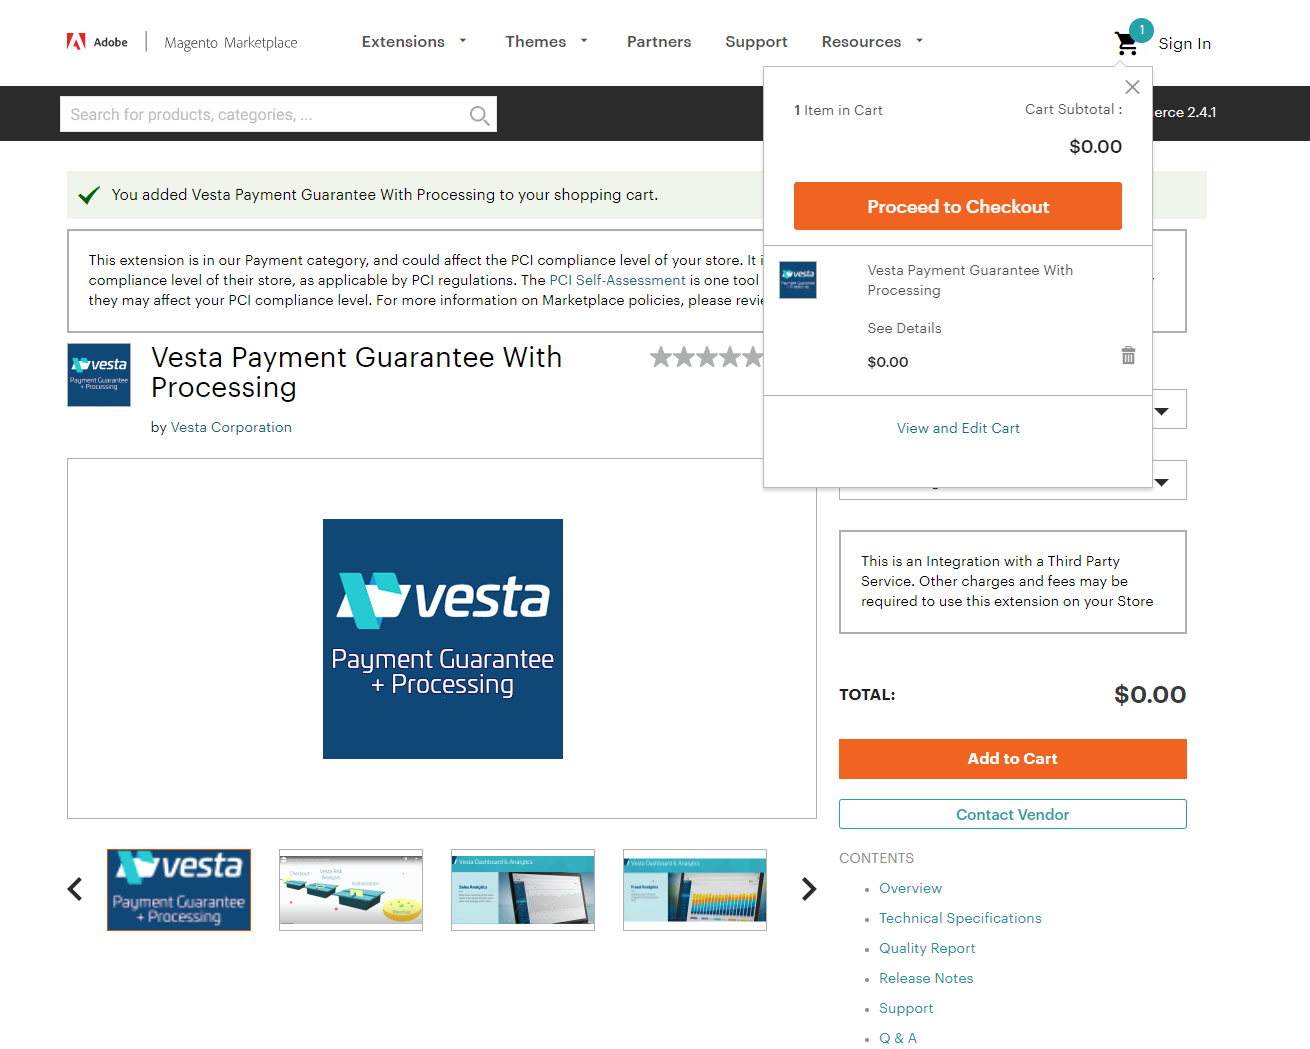
-
Add the extension to your cart. Then click on the shopping cart icon and click the Proceed to Checkout button:
-
Fill in the required details and click the Place Order button. An order confirmation screen will display.
Now that you have ordered the extension, you will install the extension in you Magento project.
-
Click on your account name in the upper-right corner of the Magento Marketplace and select My Profile. The Magento account management screen will open, as shown below:
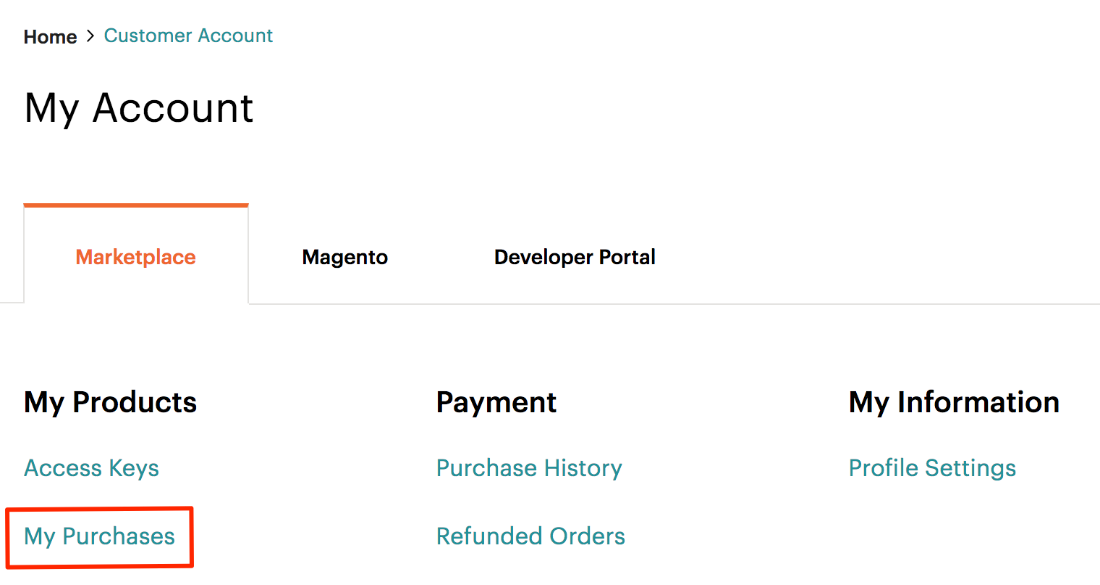
-
Click on My Purchases. Then, locate and select the Vesta extension in the list of your purchases. The details about the extension will display, as shown below:

Make a note of the Component name. You will use it to update the composer.json file associated with your Magento project.
-
Open a terminal application and navigate to your Magento project directory.
-
Run the
composer requirecommand with the Vesta extension Component name that you identified in step 5. Then, update your composer.json file to ensure that all of your dependencies are up to date.The composer require command takes the component name as an argument:
composer require *<component-name-from-above-image>*. The example below shows the command using the component name from step 5:
composer require vestacorporation/module-guaranteeWait for Composer to finish updating to make sure there are not any errors.
-
Verify that the extension is installed properly by using the following command:
bin/magento module:status Vesta_Guarantee -
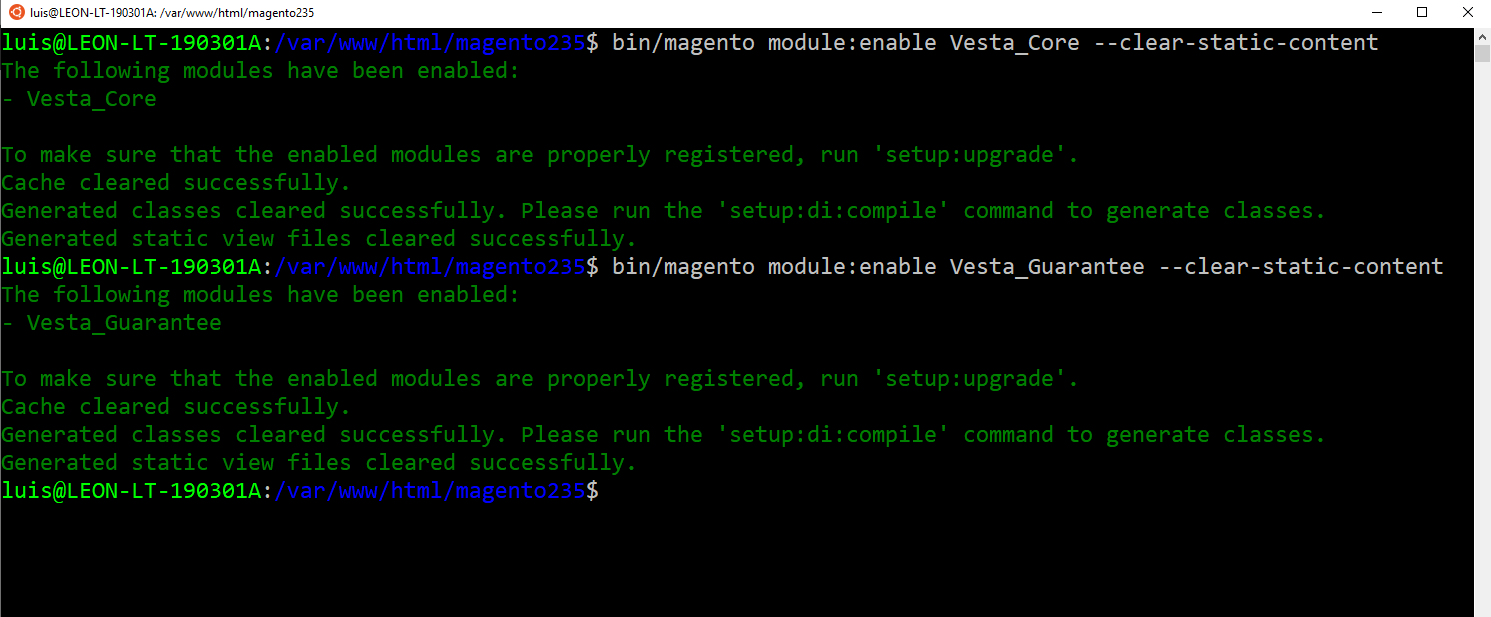
The extension is typically disabled by default. Use the following commands to enable the extension:
bin/magento module:enable Vesta_Core --clear-static-content
bin/magento module:enable Vesta_Guarantee --clear-static-contentThe image below shows the expected output of enabling the extension:
-
Next, use the following command to register the extension:
bin/magento setup:upgrade -
If you are setting up the extension for production, run the following command:
bin/magento setup:di:compile -
Use the following command to clean the cache:
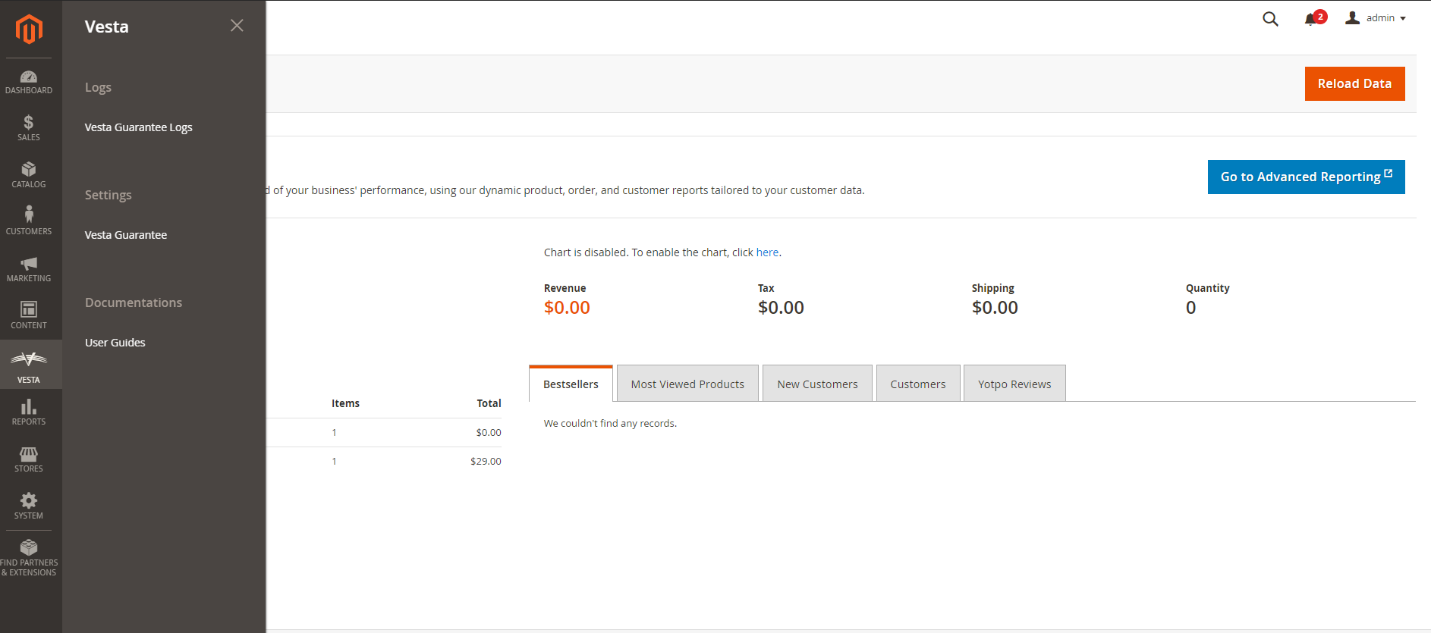
bin/magento cache:cleanThe Vesta extension settings will now be available in the administration dashboard of your Magento site as shown in the left hand navigation in the image below:
Setup
The sections below describe how to enter your Vesta account information for the Guarantee and Guarantee + Processing extensions in the Magento dashboard.
Guarantee
Follow the steps below to connect the Guarantee extension to your Vesta account:
-
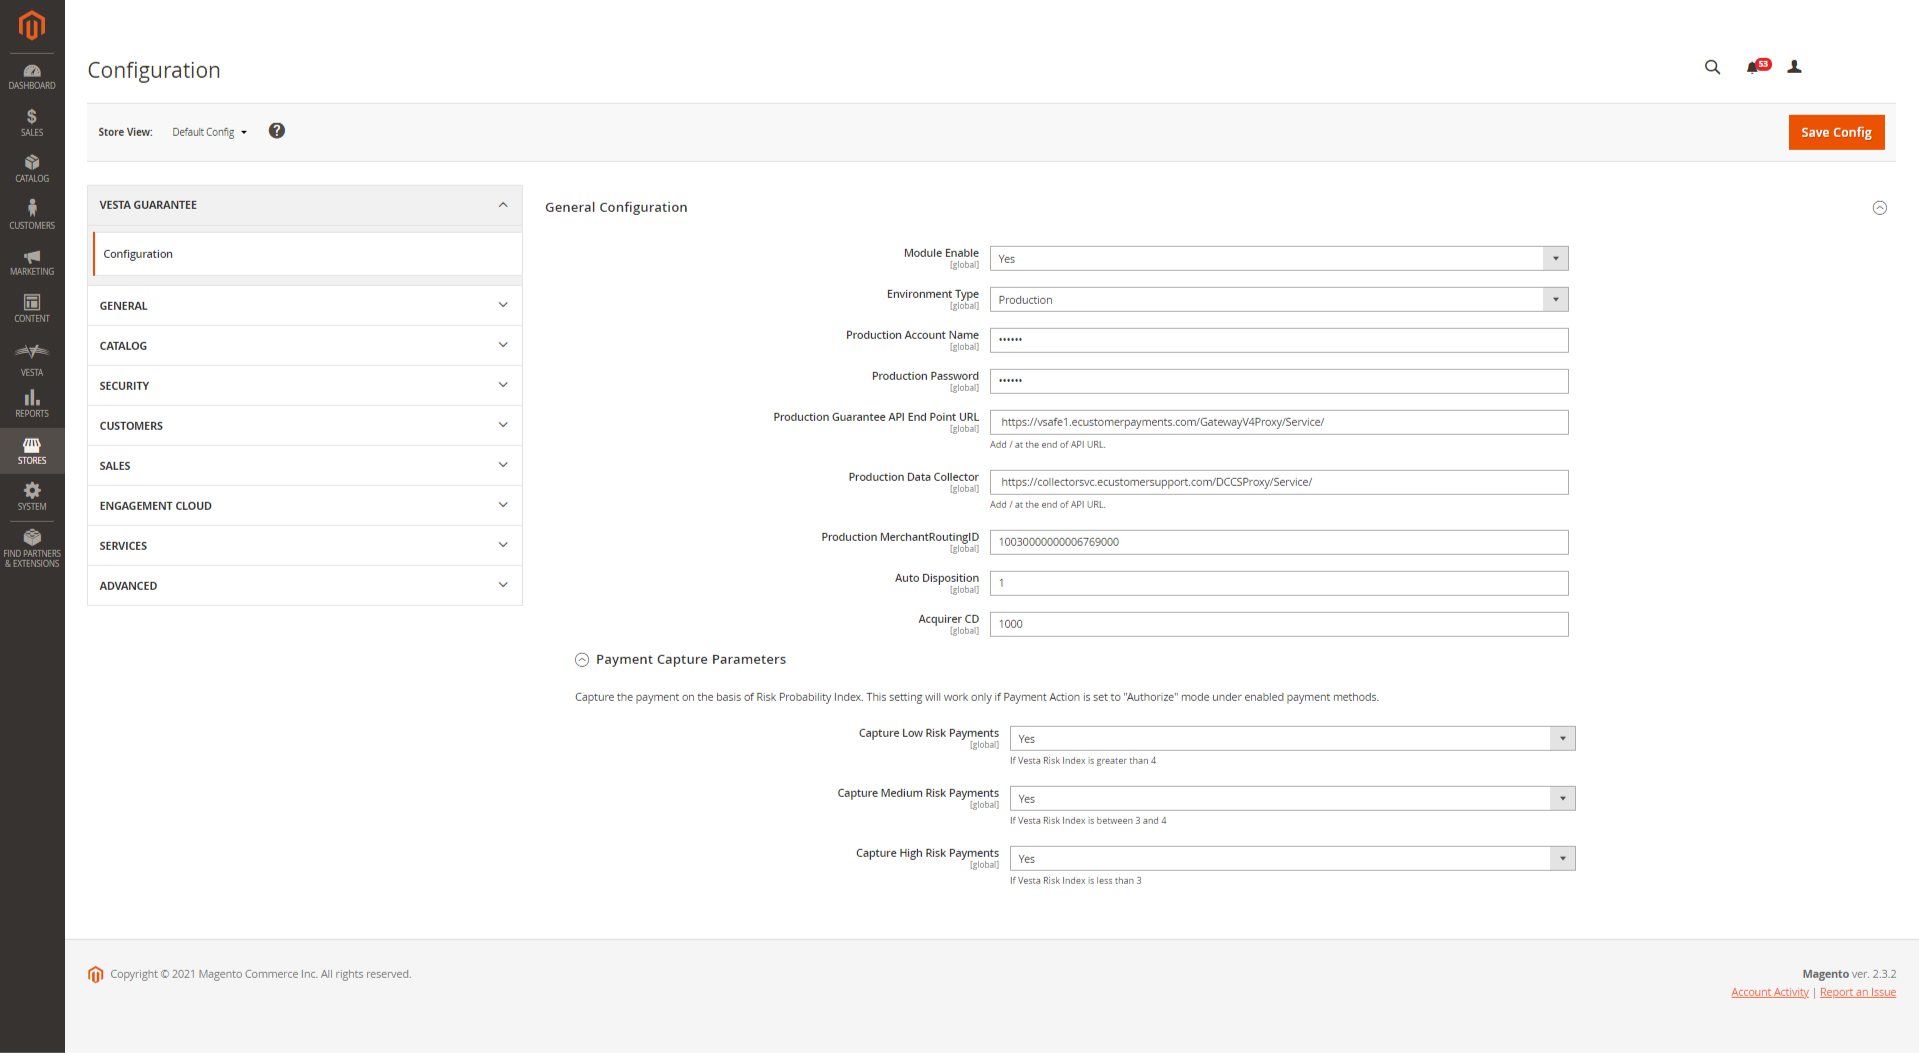
Open the admin dashboard of your Magento site and click on Vesta on the left side of the screen. The General Configuration page shown below will open:
-
Select Yes from the Module Enable dropdown menu to enable the Vesta extension.
-
Select the correct environment: production or sandbox. The extension can only work in one mode at a time.
For implementations in the sandbox environment, enter the following details in the settings screen:
- Account Name - Your Vesta account name, which is available in the Vesta portal.
- Password - Your Vesta account password, which is available in the Vesta portal.
- Guarantee API URL - The base path of the Vesta API, which is available in the Vesta portal.
- Data Collector URL - The URL that will be used to send behavioral data to Vesta, which is available in the Vesta portal.
- Merchant Routing ID - A routing ID for submitting transactions for processing, which is available in the Vesta portal.
- AutoDisposition - Identifies whether your site will automatically notify Vesta of the final result of a transaction.
- Acquirer CD - Set the value of this attribute to
1000. - Payment Capture Parameters - Set the levels of acceptable risk for your business.
- Sandbox Partner ID - A unique identifier for your sandbox account, which is provided by your Onboarding Specialist.
For implementations in the production environment, enter the following details in the settings:
- Account Name - Your Vesta account name, provided by your Onboarding Specialist.
- Password - Your Vesta account password, provided by your Onboarding Specialist.
- Guarantee API URL - The base path of the Vesta API, which is available in the Vesta portal.
- Data Collector URL - The URL that will be used to send behavioral data to Vesta, which is available in the Vesta portal..
- Merchant Routing ID - A routing ID for submitting transactions for processing, provided by your Onboarding Specialist.
-
AutoDisposition - Identifies whether your site will automatically notify Vesta of the final result of a transaction.
-
Acquirer CD - Set the value of this attribute to
1000. - Payment Capture Parameters - Set the levels of acceptable risk for your business.
-
Save your settings.
You are now ready to begin using the extension. Log in to Vesta’s vPortal for additional information about the transactions submitted through your Magento storefront.
Guarantee + Processing
Follow the steps below to connect the Guarantee + Processing extension to your Vesta account:
-
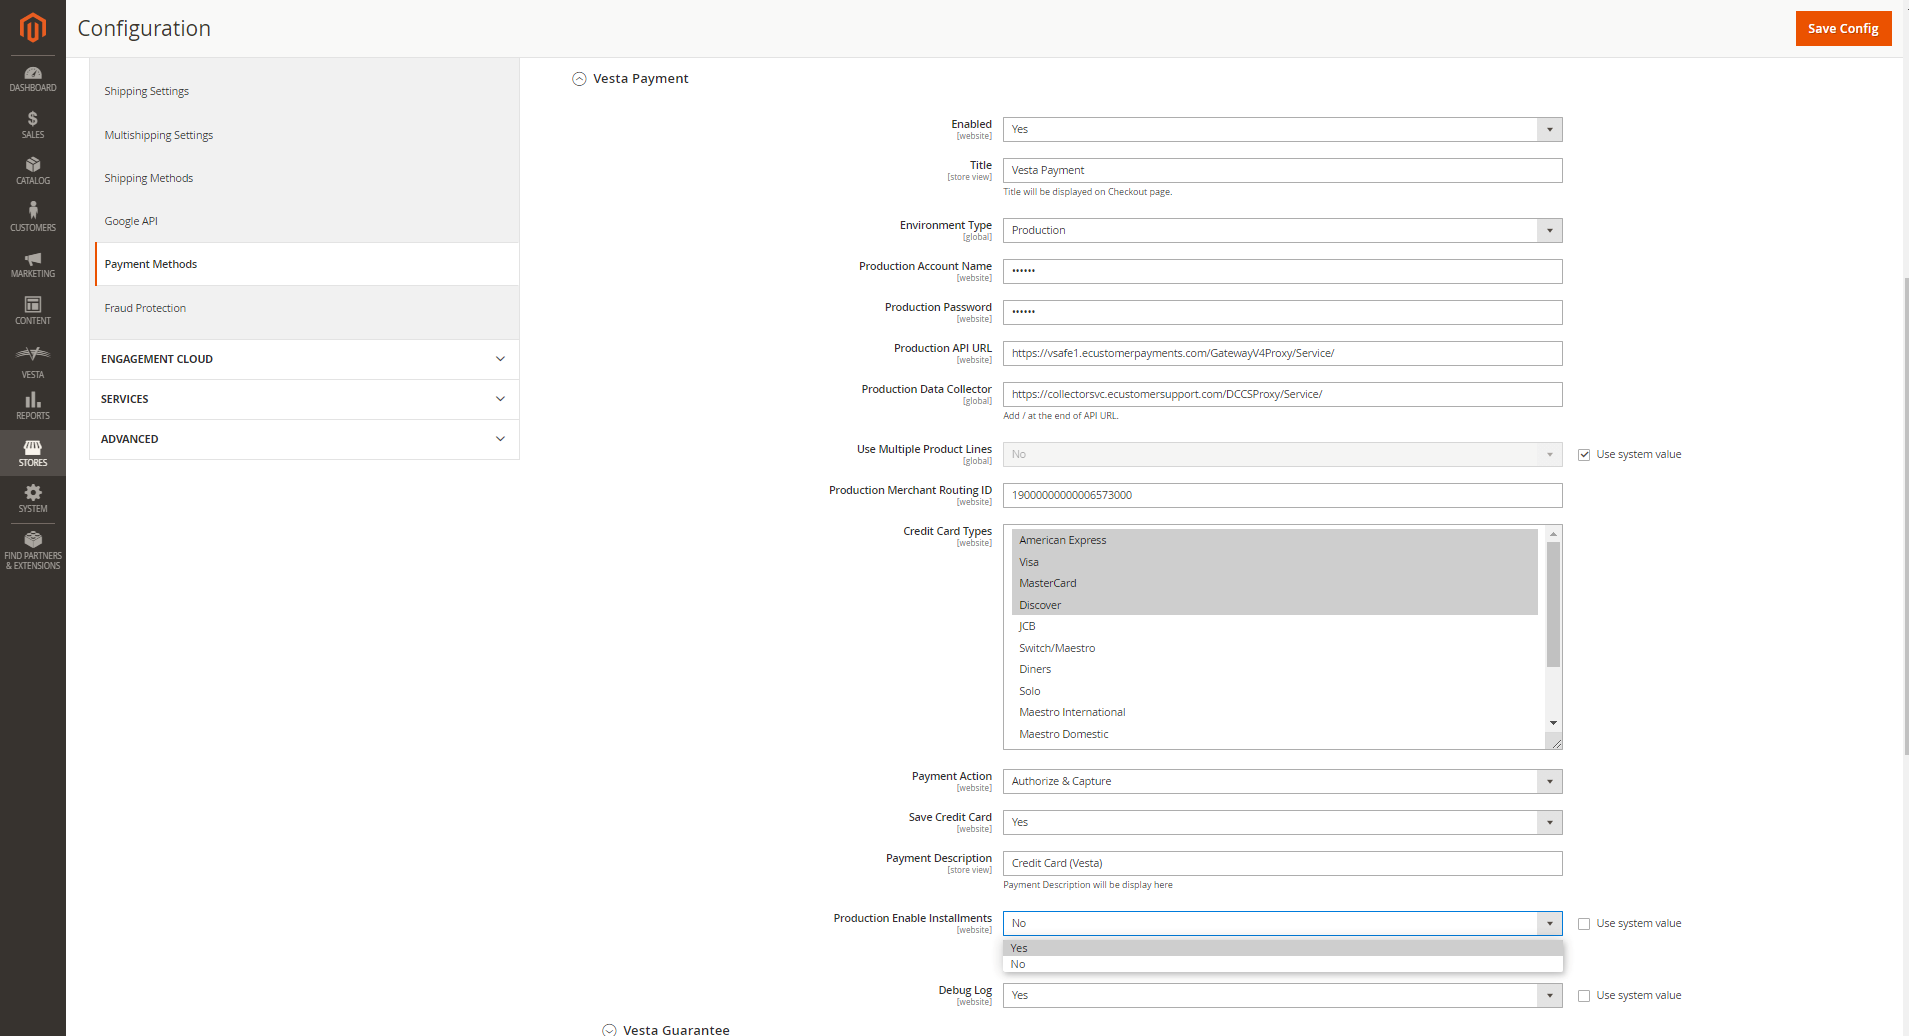
Open the admin dashboard of your Magento site and click on Vesta on the left side of the screen. The General Configuration page shown below will open:
-
Select Yes from the Module Enable dropdown menu to enable the Vesta extension.
-
Select the correct environment: production or sandbox. The extension can only work in one mode at a time.
For implementations in the sandbox environment, enter the following details in the settings screen:
- Account Name - Your Vesta account name, which is available in the Vesta portal.
- Password - Your Vesta account password, which is available in the Vesta portal.
- Production API URL - The base path of the Vesta API, which is available in the Vesta portal.
- Data Collector URL - The URL that will be used to send behavioral data to Vesta, which is available in the Vesta portal.
- Merchant Routing ID - A routing ID for submitting transactions for processing, which is available in the Vesta portal.
- Credit Card Types - Select the credit card types that you accept based on your processing agreement with Vesta.
- Payment Action - Select whether approved transactions should be submitted for authorization only or authorization plus capture at the time that the payment is submitted for processing.
- Save Credit Card - Select whether your site will offer to save the customer’s credit card information for future purchases.
- Payment Description - Enter the text that your site will use to describe the payment type, for example “Credit Card”.
- Enable Installments - Select whether you will accept installment payments on your site.
- AutoDisposition - Identifies whether your site will automatically notify Vesta of the final result of a transaction.
- Debug Log - Enable or disable logging on your site for testing and certification purposes.
- Acquirer CD - Set the value of this attribute to
1000. - Payment Capture Parameters - Set the levels of acceptable risk for your business.
- Sandbox Partner ID - A unique identifier for your sandbox account, which is provided by your Onboarding Specialist.
For implementations in the production environment, enter the following details in the settings:
- Account Name - Your Vesta account name, provided by your Onboarding Specialist.
- Password - Your Vesta account password, provided by your Onboarding Specialist.
- Production API URL - The base path of the Vesta API, which is available in the Vesta Portal.
- Data Collector URL - The URL that will be used to send behavioral data to Vesta, which is available in the Vesta Portal.
- Merchant Routing ID - A routing ID for submitting transactions for processing, provided by your Onboarding Specialist.
- Credit Card Types - Select the credit card types that you accept based on your processing agreement with Vesta.
- Payment Action - Select whether approved transactions should be submitted for authorization only or authorization plus capture at the time that the payment is submitted for processing.
- Save Credit Card - Select whether your site will offer to save the customer’s credit card information for future purchases.
- Payment Description - Enter the text that your site will use to describe the payment type, for example “Credit Card”.
- Enable Installments - Select whether you will accept installment payments on your site.
- AutoDisposition - Identifies whether your site will automatically notify Vesta of the final result of a transaction.
- Debug Log - Enable or disable logging on your site for testing and certification purposes.
- Acquirer CD - Set the value of this attribute to
1000. - Payment Capture Parameters - Set the levels of acceptable risk for your business.
-
Save your settings.
You are now ready to begin using the extension. Log in to Vesta’s vPortal for additional information about the transactions submitted through your Magento storefront.