Behavioral Data Collector - iOS Project Integration
This page describes how to integrate Vesta’s iOS SDK into your iOS app project. During the integration, you will perform the following actions:
- Import the Library - Add Vesta’s libraries to your project.
- Initialize the Data Collector - Call the data collector start method to begin tracking your user’s behavior.
- Provide Location Data - If you choose to track your user’s location, send Vesta the latitude and longitude from the device.
- Implement Field Tagging and Event Tracking - Add tags to the UI elements of your application, and add event methods to buttons and screens so that Vesta can watch them for indications of fraud.
Import the Library
Import the library into your project in order the begin using the Vesta methods.
The steps below describe how to add the library files to your project:
-
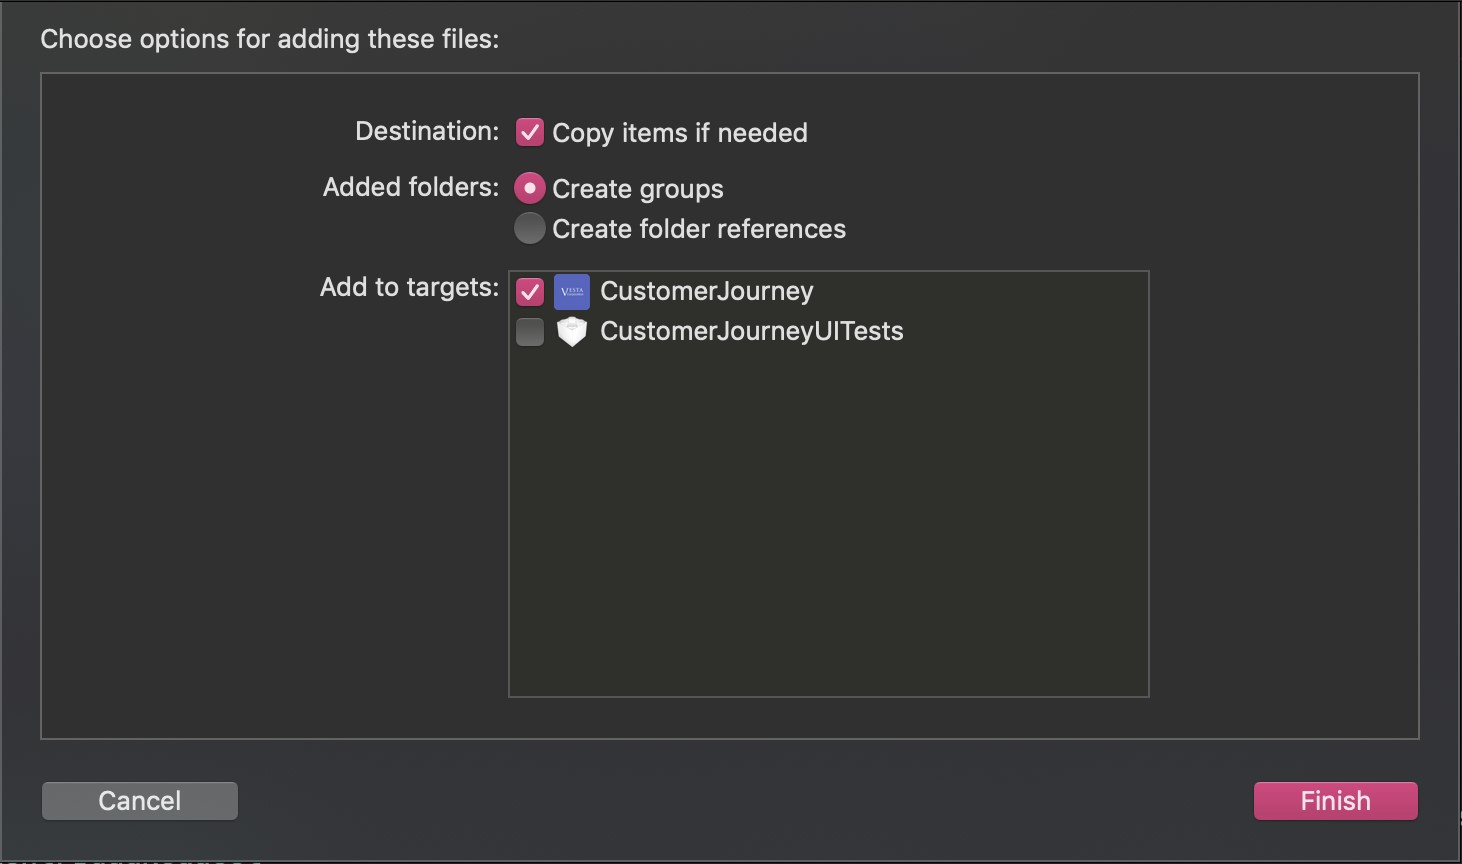
Add the library to the project target where you want to use it. Be sure to select the “Copy items if needed” option. The image below shows how to import the library to a project called CustomerJourney:
-
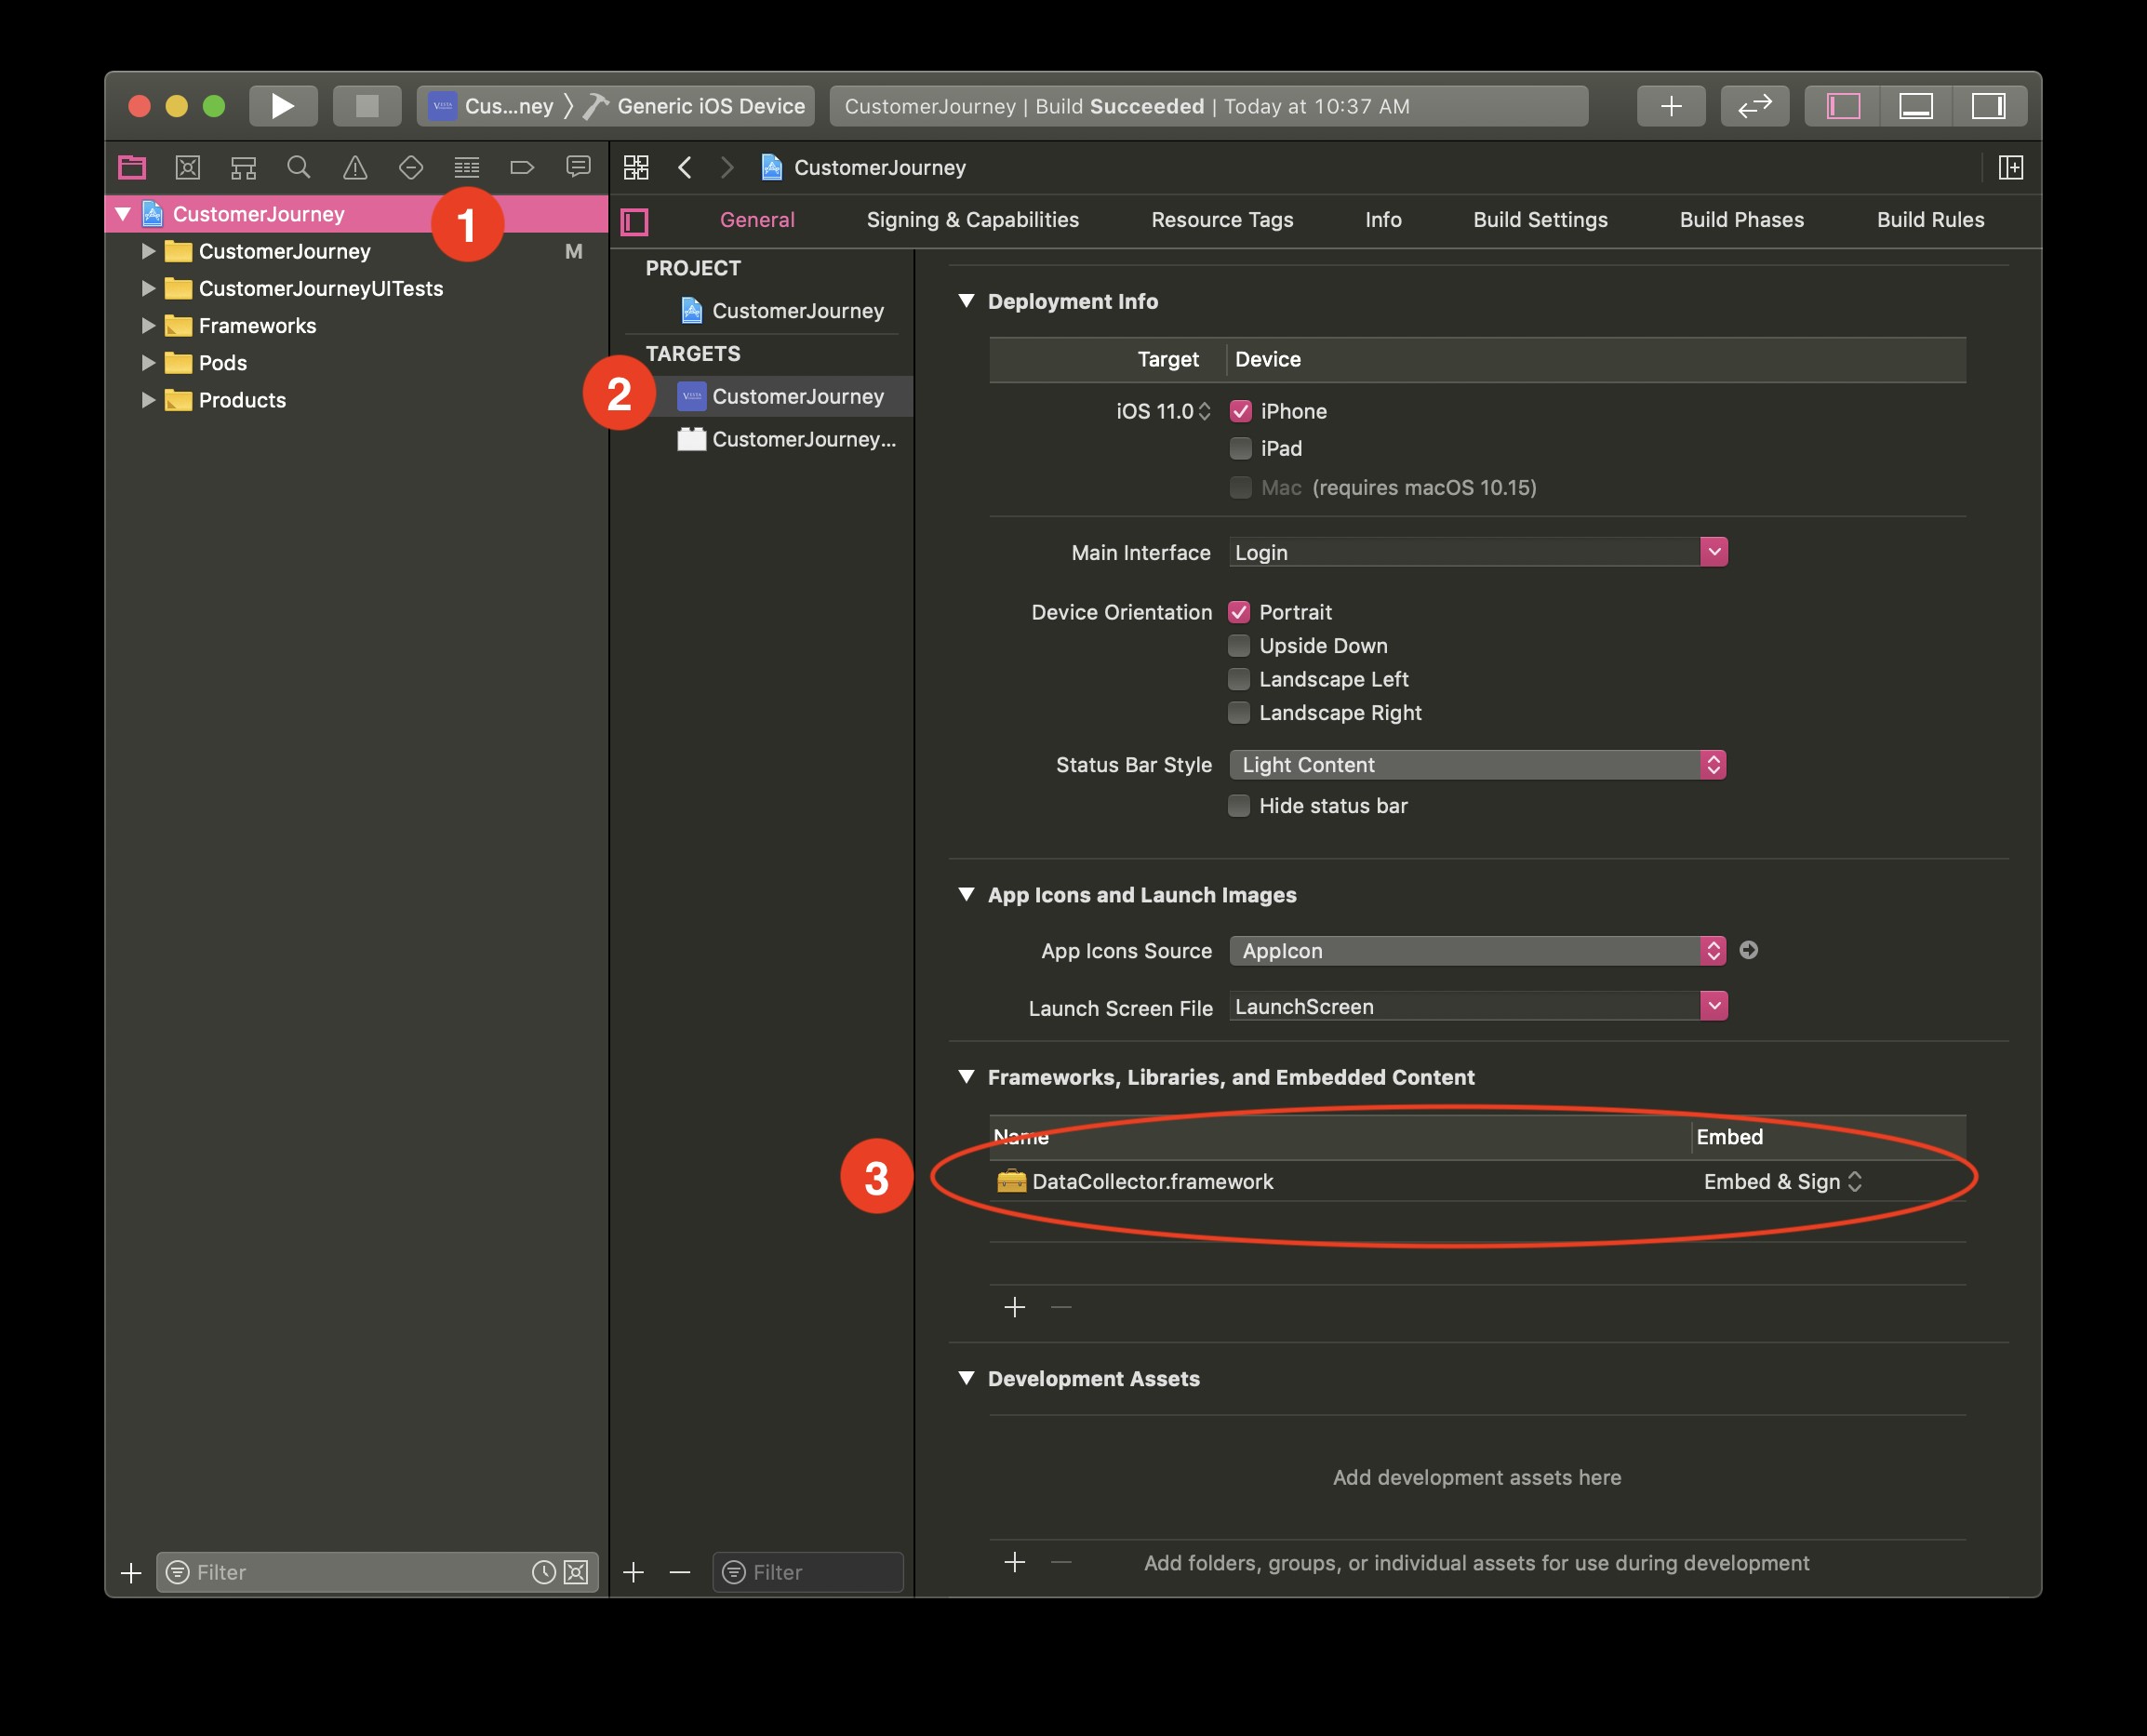
Confirm that the framework was properly added to your project and select “Embed & Sign” from the options in the Embed column, as shown in the image below:
Now that the SDK in included in your project, you must set it up to initialize when your app launches.
Initialize the Data Collector
Initialize the Data Collector at the beginning of your app flow so that it can report the data that it tracks to Vesta. To initialize the Data Collector, call the DataCollector.default.initialize() method from within a function that you define. Call your function as soon as your app launches and pass the following parameters to the initialize() method:
| Parameter Name | Description | Type |
|---|---|---|
| AccountName | Your company’s Vesta account name, provided by a Customer Success representative. | String |
| Region | The identifier for the region in which your application is used: 'APAC' or 'US'. |
String |
| SandboxEnabled | Identifies whether you are using the sandbox environment for both vSafe and DataCollector services: * true - Use the sandbox environment. * false - Use the production environment. Your application must be approved by Vesta before moving to production. |
Boolean |
The code below provides an example of how to initialize the data collector using the DataCollector.default.initialize() method:
import DataCollector
func initializeDataCollectorService() {
   DataCollectorService.default.initialize(withAccountName:
      "AccountName", region: .US, sandboxEnabled: true, completion: {
      (sessionKey)in
      if !sessionKey.isEmpty {
         print("DataCollector service initialized successfully")
      }
   }
}
The completion handler returns a sessionKey, defined in the table below. The sessionKey field will be returned whether or not the initialization was successful. If the sessionKey value is empty, something failed in the DataCollector initialization. If you continuously receive an empty sessionKey value, contact Customer Success.
| Parameter Name | Description | Type |
|---|---|---|
| SessionKey | The sessionKey is sent by Vesta’s backend and will be used by the server for downstream API calls. | String |
Provide Location Data
If you choose to track your customer’s location, use the DataCollectorService.default.sendLocationData() method to send the latitude and longitude values from your user’s device to Vesta. Vesta uses the location data to augment our fraud detection and risk analysis. Tracking location data is optional. If you choose not to track location, proceed to the Implement Field Tagging section.
The table below defines the parameters that you must pass to the DataCollectorService.default.sendLocationData() method:
| Parameter Name | Description | Type |
|---|---|---|
| latitude | The latitude value obtained from your customer’s device. | Double |
| longitude | The longitude value obtained from your customer’s device. | Double |
The code below provides and example of how to call the sendLocationData() method:
import DataCollector

func sendLocationToDataCollectorService() {
    // Previously obtained latitude<Double> from CoreLocation
    // Previously obtained latitude<Double> from CoreLocation

    DataCollectorService.default.sendLocationData(latitude: latitude, longitude: longitude) { (success) in
        if success {
            print("Location sent successfully")
        }
    }
}
The DataCollector service includes the following public properties and functions:
Properties
| Name | Description |
|---|---|
| ignoreDataCollection | Prevents DataCollector from reporting events, which is useful for automated/regression testing. |
Functions
| Name | Description |
|---|---|
| Enable basic logs to check if information is sent to the server. If enable is true, logs will only be active if the DataCollectorService is initialized in Sandbox. |
Implement Data Collector
Our iOS integration supports different ways to implement tracking depending on the type of UI element:
- Text Fields - Use field tagging to track text entry elements by subclassing the
TrackingTextfieldclass from theUITextFieldclass. - Buttons - Use the
TrackingButtonclass to track button tap events in your app. - Active Screens - Use the
EventsTrackerViewControllerclass to track the screens that your customer views and when the app moves from the background to the foreground on your user’s device.
Text Fields
Implement field tagging in your application using Interface Builder or directly in your code by setting the fieldTag property of your TrackingTextField objects. Field tagging identifies the text entry fields that Vesta will watch to collect behavioral data. Field tagging is described in detail on the Data Collector Integrations page.
Interface Builder
To use Interface Builder to implement field tagging, follow the steps below for each of the UITextField objects in your application that you intend to track.
-
Open the Identity Inspector for the
UITextFieldobject that you want to tag. -
Set the class of the
UITextFieldtoTrackingTextField, and set the Module to DataCollector as shown in the image below.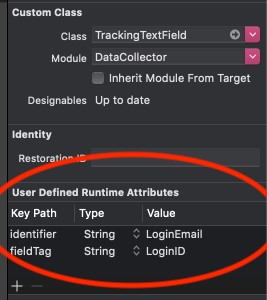
-
Open the Attributes Inspector for the
UITextFieldobject. You will see Identifier and Field Tag properties, which are defined by the theTrackingTextFieldsubclass.Alert: If you do not see the custom attributes in the Attributes Inspector, follow the steps in the Known Errors section below to define the fields manually.
-
Set the
fieldTagvalue in the Attributes Inspector, as shown in the image below. The value that you set forfieldTagmust correspond to one of the values provided by Vesta in the list of tracked fields.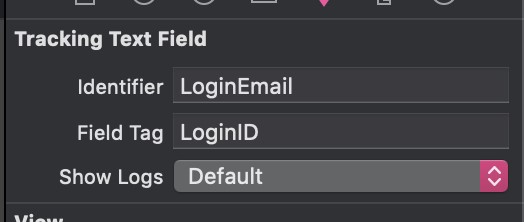
Known Issues
Occasionally, Interface Builder will not display the custom properties of the TrackingTextField in the Attributes Inspector. Follow the steps below to define them manually:
-
Define any necessary information in the Connections Inspector first. If you do not define the connections first, setting the class in the Identity Inspector may cause the connections to disappear from the list, and you will not be able to set them. The image below shows the typical properties of the connections inspector:
-
Open the Identity Inspector, set the class to
TrackingTextField, and set the Module to DataCollector. -
Click the + button at the bottom of the Identity Inspector to add a User Defined Runtime Attribute.
-
Add the runtime attributes shown in the image below:
Code
The information in this section describes how to set the fieldTag property on your TrackingTextField classes using code. Using code to implement field tagging is easier and less likely to cause bugs than using the Interface Builder. Follow the steps below for each of your TrackingTextField objects to implement field tagging in your code:
- Set the
fieldTagproperty of theTrackingTextFieldobject. - Access the enum values of the
TrackingTextFieldobject and cast them to theirstring rawValue.
The code below shows an example of tagging the username and password fields as LoginID and Password:
import DataCollector

// You can use any default or convenience initializer

let emailTextField = TrackingTextField()
let passwordTextField = TrackingTextField()

emailTextField.fieldTag = FieldTags.LoginID.rawValue
passwordTextField.fieldTag = FieldTags.Password.rawValue
VestaTextWatcher
Implement the VestaTextWatcher class to track any UITextField and any components that implement UITextField, like UISearchBar, and UITextView. Follow the steps below to implement VestaTextWatcher:
- Make sure your UI subclasses conform to
FieldTrackingProtocol.FieldTrackingProtocolrequires you to set aFieldTagsvariable that will be used to report the events back to Vesta. - Create an instance of
VestaTextWatcherand callstartTracking()at an appropriate place in your application to start tracking the user interaction. Vesta recommends starting tracking inviewWillAppear. - Call
stopTracking()on yourVestaTextWatcherinstance when you are done tracking using interaction. Vesta recommends stopping tracking inviewDidDisappear.
The code below shows how to implement VestaTextWatcher:
import DataCollector
class MyTextField: UITextField, FieldTrackingProtocol {
   // You can initialize it to None and change it to something trackable if needed
   var fieldTag: FieldTags = .None
}
class MySearchBar: UISearchBar, FieldTrackingProtocol {
   // You can initialize it to None and change it to something trackable if needed
   var fieldTag: FieldTags = .None
}
class MyOwnTextView: AnotherTextViewUIComponent, FieldTrackingProtocol {
   // You can initialize it to None and change it to something trackable if needed
   var fieldTag: FieldTags = .None
}
class ViewController: UIViewController {
   // VestaTextWatcher instance for this screen
   let vestaTextWatcher = VestaTextWatcher()
       @ IBOutlet private weak var emailTextField: MyTextField!
       @ IBOutlet private weak var passwordTextField: MyTextField!
       @ IBOutlet private weak var mySearchBar: MySearchBar!
       @ IBOutlet private weak var myTextView: MyOwnTextView!
      override func viewDidLoad() {
      super.viewDidLoad()
      // Do any additional setup after loading the view.
      // Setting the fieldTag property on the elements before startTracking so it works
      emailTextField.fieldTag = FieldTags.LoginID
         passwordTextField.fieldTag = FieldTags.Password
         mySearchBar.fieldTag = FieldTags.ProductSearch
         myTextView.fieldTag = FieldTags.BillingAddressLine1
   }
   override func viewWillAppear(_ animated: Bool) {
      super.viewWillAppear(animated)
      // We recommend having the startTracking function in the viewWillAppear function for better results
      vestaTextWatcher.startTracking()
   }
   override func viewDidDisappear(_ animated: Bool) {
      super.viewDidDisappear(animated)
      // We recommend having the stopTracking function in the viewDidDisappear function for better results
      vestaTextWatcher.stopTracking()
   }
}
Vesta recommends creating an instance of VestaTextWatcher for each screen for better handling of tracking. Having a single instance for the whole application lifecycle might cause unexpected behavior. Also, make sure to only use either VestaTextWatcher functionality or TrackingTextField subclassing on each screen. Trying to track both at the same time in the same screen might cause unexpected behavior.
Buttons
To track button taps in your app, subclass TrackingButton from the UIButton class in Interface Builder or directly in your code.
Interface Builder
To use Interface Builder to implement field tagging, follow the steps below for each of the UIButton objects in your application that you intend to track.
-
Open the Identity Inspector for the
UIButtonobject that you want to tag. -
Set the class of the
UIButtontoTrackingButton, and set the Module toDataCollectoras shown in the image below.
Alert: If any options disappear from the Connections Inspector after setting the class and module in the Identity Inspector, you must set your connections first. Follow the steps in the Known Issues section below.
Known Issues
Occasionally, options will disappear from the Connection Inspector after setting the class in Interface Builder. If this happens, follow the steps below to define your connections before defining the TrackingButton class:
-
Define any necessary information in the Connections Inspector. The image below shows the typical properties of the connections inspector:
-
Open the Identity Inspector, set the class to
TrackingTextField, and set the Module to DataCollector as described in the Interface Builder section above.
Code
To implement data collector for buttons using code, you must set the trackingAction property to one of the values defined in the ButtonTrackingAction.swift enum.
The code below shows an example of setting trackingAction property on a login button:
import DataCollector

class LoginViewController: UIViewController {

    @IBOutlet private weak var loginButton: TrackingButton!

    override func viewDidLoad() {
        super.viewDidLoad()

        loginButton.trackingAction = .LoginAttempt
If you are creating buttons using default or convenience initializers, you can assign the trackingAction property as shown in the code below:
let signUpButton = TrackingButton()
signUpButton.trackingAction = .SignUp
Pickers
The TrackingPickerView subclass tracks the time that a UIPickerView element is present on the screen. The timing starts from the moment the element is added with addSubview or shown with hidden = false. The timing stops when the picker element is removed from the screen.
To implement the TrackingPickerView subclass you must use a property called fieldTag and use a value from the enum defined in the FieldTags.swift file. See the Field Tagging page for additional details. All events tracked and generated by TrackingPickerView subclasses are automatically reported to the DataCollector service events.
Implement the TrackingPickerView subclass as described in the sections below.
Interface Builder
In the Identity Inspector, set the class of the UIPickerView to TrackingPickerView. Manually set the the module name to DataCollector manually.
Code
Set the fieldTag property to one of the values defined in the FieldTags.swift enum, as shown in the example below:
import DataCollector
class YourViewController: UIViewController {
    @ IBOutlet private weak var pickerView: TrackingPickerView!
   override func viewDidLoad() {
      super.viewDidLoad()
      pickerView.fieldTag = FieldTags.PurchaseCardExpirationDateMonth.rawValue
         // You can also create the button with code using any
      default or convenience initializer
         let anotherPickerView = TrackingPickerView()
            anotherPickerView.fieldTag = FieldTags.PurchaseCardExpirationDateYear.rawValue
   }
}
If you don’t want a picker view to be tracked but it still overrides from TrackingPickerView for some reason, you can use the FieldTags value of None which will prevent the picker view from being tracked.
Occasionally, options disappear from the Connection Inspector after setting the class in Interface Builder. To avoid this, set all of your options in the Connections Inspector first, and then set the class to the one you want to use. Even if you see a warning sign, no errors or warnings will be generated when building the project.
Active Screens
Setting up data collector to track the active screen lets Vesta analyze your customers’ behavior as they browse your app or activate it from the background. Follow the steps below to implement screen tracking:
- Subclass your
UIViewControllerfrom theEventsTrackerViewControllerclass. - Override the
screenTagproperty and return a value defined in theScreenTags.swift enum.
The code below provides an example of how to implement screen tracking:
import DataCollector

class LoginViewController: EventsTrackerViewController {

    @IBOutlet private weak var loginButton: TrackingButton!

    override var screenTag: ScreenTags {
        return .Login
    }

    override func viewDidLoad() {
        super.viewDidLoad()

        loginButton.trackingAction = .LoginAttempt
    }
}
Known Issues
If your app base support is iOS 12 or older, and if you are using @objc methods in extensions to @objc classes, you will get compile errors. Use one of the following solutions to prevent these errors:
- ● Increase your app base support to iOS 13
- ● Move all of your
@objcavailable methods from an extension in to the class definition
The code below shows an example of moving your available method definitions into the class definition:
import DataCollector
class LoginViewController: EventsTrackerViewController {
   override var screenTag: ScreenTags {
      return .Login
   }
   override func viewDidLoad() {
      super.viewDidLoad()
   }
}
 @ IBAction func buttonFunction() { // This is fine
}
 @ objc func anotherObjcFunction() { // This works too
}
Logs
When working with the Data Collector framework, logs are disabled by default. You can enable logs for each of the objects described in the sections above by setting the showLogs static variable to true. For TrackingTextField objects, you can enable and disable logs on a per object basis. The code below shows how to enable logs using the different approaches:
import DataCollector

// Enables logs for DataCollectorService
DataCollectorService.showLogs = true

// Enables logs for this TrackingTextField
let trackingTextField = TrackingTextField()
trackingTextField.showLogs = true

// Enables logs for ALL TrackingTextField instances (bypasses instance showLogs var)
TrackingTextField.showLogs = true