Device Fingerprinting - Android Integration
This page describes how to add the Threatmetrix SDK to your Android project.
To download Device Fingerprinting SDKs, log in to vPortal and navigate to the Help Center.
Once you have added the ThreatMetrix files to your project, your application will automatically generate a device fingerprint during initialization.
Integration
The sections below describe how to add the ThreatMetrix modules to your Android project. The Overview section describes the process and defines the files you will need to include. The Guide section provides step-by-step instructions for adding the modules to your project and ensuring that your application has the required settings.
Overview
Integrating Device Fingerprinting into your application requires creating new modules for the following files that are provided by Threatmetrix:
- TMXProfilingConnections-7.2-32.aar - Handles transferring data to and from the Threatmetrix backend.
- TMXProfiling-7.2-32.aar - Manages the generation of device profiles.
Guide
Follow the steps below to add the ThreatMetrix modules to your project:
-
Include TMXProfiling-7.2-32.aar and TMXProfilingConnections-7.2-32.aar in your app/libs directory.
-
Set your
compileSdkVersionandtargetSdkVersionto30. -
Open your project in AndroidStudio.
-
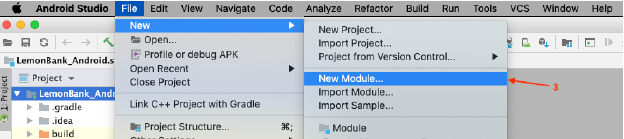
From the main menu, select File > New > New Module, as shown in the image below:
-
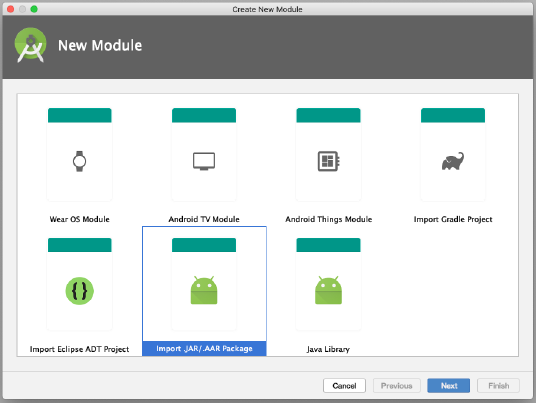
On the Create New Module screen, select “Import .JAR/.AAR Package”, as shown in the image below. Then click the Next button.
-
Enter the path to the TMXProfiling-7.2-32.aar file. Then click Finish.
-
Repeat steps 3, 4, and 5 for the TMXProfilingConnections-7.2-32.aar module.
-
Open your settings.gradle file, and confirm that TMXProfiling and TMXProfilingConnections are listed at the top, as shown in the image below. Add the files to the list if they are not already added. TMXBehavioralBiometrics.aar, and TMXDeviceSecurityHealth.aar are not required for this integration.

-
Add the following two lines to your app’s build.gradle file:
implementation(name: 'TMXProfiling-7.2-32', ext: 'aar') implementation(name: 'TMXProfilingConnections-7.2-32', ext: 'aar') -
Add a function called
mTrustDfenderIntegrationand call it after you receive yourwebSessionID. In the examples below, theorgIdvalue is your organization’s Vesta identifier.Use the code below for Java applications:
mTrustDefenderIntegration(getBaseContext(), orgID, webSessionId);
private void mTrustDefenderIntegration(Context context, String orgId, String webSessionId) {
    String deviceId;

    TMXProfilingConnections connections = new TMXProfilingConnections();
    connections.setRetryTimes(2);

    /*
     * Class to get orgId and FPServer url
     */
    final TMXConfig config = new TMXConfig();
    config.setContext(context.getApplicationContext());
    config.setOrgId(orgId);
    config.setFPServer(RestUrl.FP_SERVER);
    /*
     * Set this method to true if you are not using Location APIs in your app.
     * If you are using Location Apis then just pass the Location object in the profiling section.
     */
    config.setRegisterForLocationServices(true);
    config.setProfilingConnections(connections);
    // Initialization of TrustDefender.
    TMXProfiling.getInstance().init(config);

    // Getting device id to uniquely identify the device.
    deviceId = Settings.Secure.getString(context.getContentResolver(), Settings.Secure.ANDROID_ID);

    // setting device attribute in a list.
    List<String> deviceAttributesList = new ArrayList<>();
    deviceAttributesList.add(android.os.Build.BRAND);
    deviceAttributesList.add(android.os.Build.MANUFACTURER);
    deviceAttributesList.add(android.os.Build.MODEL);
    deviceAttributesList.add(deviceId);

    Logger.e("Device Information", deviceAttributesList.toString());

    // Class for doing profiling process, here we are passing device attribute list, WebSessionId and device current location.
    TMXProfilingOptions profilingOptions = new TMXProfilingOptions();
    profilingOptions.setSessionID(webSessionId);
    /*
     * If your app is using Location Apis then just pass the Location object in the below method, else
     * make this method of Config class to true 'config.setRegisterForLocationServices(true)'.
     */
    // profilingOptions.setLocation(Location object);
    profilingOptions.setCustomAttributes(deviceAttributesList);

    // Managing Profiling result.

    TMXProfiling.getInstance().profile(profilingOptions, new TMXEndNotifier() {
        @Override
        public void complete(TMXProfilingHandle.Result result) {
            if (result != null) {
                TMXStatusCode profilingResult = result.getStatus();
                if (profilingResult == TMXStatusCode.TMX_OK) {
                    Logger.e("Profiling Result", profilingResult.toString() + " " + result.getStatus().getDesc());
                    Logger.e("SessionId after Profiling", " " + result.getSessionID());
                    // doing package scan if profiling result is okay.
                    // TrustDefender.getInstance().doPackageScan();
                    // setting profiling done to true.

                } else {
                    // setting profiling done to false.
                    Logger.e("Profiling Result", profilingResult.toString() + " " + result.getStatus().getDesc());
                }
            }
        }
    });
}
Use the code below for Kotlin applications:
mTrustDefenderIntegration(context, orgID, webSessionId) private fun mTrustDefenderIntegration(context: Context, orgId: String, webSessionId: String) { val deviceId: String val connections = TMXProfilingConnections() connections.setRetryTimes(2) val FP_SERVER = "h.online-metrix.net" /* * Class to get orgId and FPServer url */ val config = TMXConfig() config.setContext(context.applicationContext) config.setOrgId(orgId) config.setFPServer(FP_SERVER) /* * Set this method to true if you are not using Location APIs in your app. * If you are using Location Apis then just pass the Location object in the profiling section. */config.setRegisterForLocationServices(true) config.setProfilingConnections(connections) // Initialization of TrustDefender. TMXProfiling.getInstance().init(config) // Getting device id to uniquely identify the device. deviceId = Settings.Secure.getString(context.contentResolver, Settings.Secure.ANDROID_ID) // setting device attribute in a list. val deviceAttributesList: MutableList<String> = ArrayList() deviceAttributesList.add(Build.BRAND) deviceAttributesList.add(Build.MANUFACTURER) deviceAttributesList.add(Build.MODEL) deviceAttributesList.add(deviceId) Log.d("Device Information", deviceAttributesList.toString()) // Class for doing profiling process, here we are passing device attribute list, WebSessionId and device current location. val profilingOptions = TMXProfilingOptions() profilingOptions.setSessionID(webSessionId) /* * If your app is using Location Apis then just pass the Location object in the below method, else * make this method of Config class to true 'config.setRegisterForLocationServices(true)'. */ // profilingOptions.setLocation(Location object); profilingOptions.setCustomAttributes(deviceAttributesList) // Managing Profiling result. TMXProfiling.getInstance().profile( profilingOptions ) { result -> if (result != null) { val profilingResult = result.status if (profilingResult == TMXStatusCode.TMX_OK) { Log.d( "Profiling Result", profilingResult.toString() + " " + result.status.desc ) Log.d("After Profiling", " " + result.sessionID) // doing package scan if profiling result is okay. // TrustDefender.getInstance().doPackageScan(); // setting profiling done to true. } else { // setting profiling done to false. Log.d( "Profiling Result", profilingResult.toString() + " " + result.status.desc ) } } } } -
Sync your application.
-
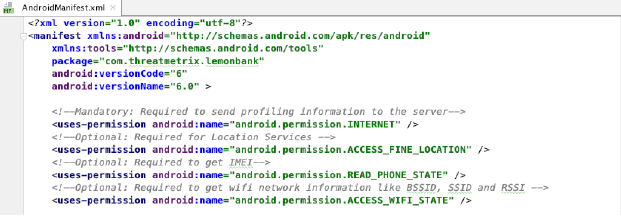
Open your AndroidManifest.xml file and add INTERNET permissions to your application, if it is not already added. The image below shows the AndroidManifest.xml with INTERNET permissions added: