Behavioral Data Collector - Android Project Integration
This page describes how to integrate Vesta’s Android SDK into your Android project. During the integration, you will perform the following actions:
- Import the Library - Add Vesta’s libraries to your project.
- Initialize the Data Collector - Call the data collector start method to begin tracking your user’s behavior.
- Provide Location Data - If you choose to track your user’s location, send Vesta the latitude and longitude from the device.
- Implement Field Tagging - Add tags to the UI elements of your application so that Vesta can watch them for indications of fraud.
Import the Library
Import the library into your Android Studio project in order the begin using the data collector methods. The steps below describe how to add the library files to your project:
-
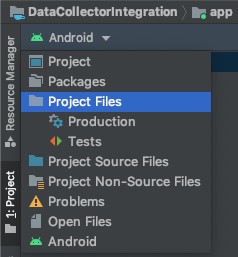
Select the Project Files view from the drop-down list in Android Studio, as shown below:
-
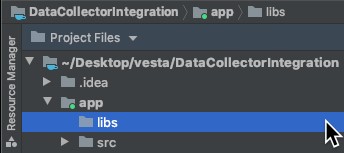
Expand the application module directory, which is commonly called “app”. Then, locate the “libs” directory. If the “libs” directory does not exist, create it. The image below shows the file hierarchy:
-
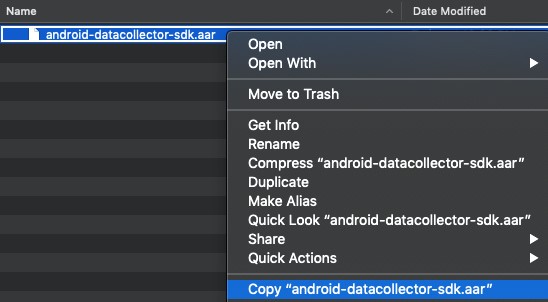
In your file explorer, search for the “android-datacollector-sdk.aar” file, and copy it. The image below shows how to copy the file:
-
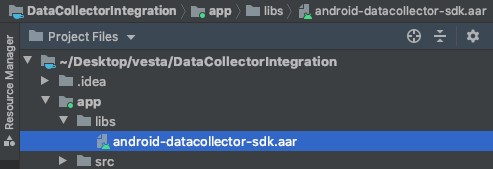
Paste the “android-datacollector-sdk.aar” file into the “libs” directory in your Android project, as shown in the image below:
-
Locate your “app/build.gradle” file and paste the code below into it:
implementation fileTree(dir: "libs", include: ["*.aar"]) -
Declare the following dependencies in your main app, which is commonly called “:app” in your Android Studio project
Use the code below for Android 5.0 and newer:
// Dependencies required by the Vesta Data Collector SDK
implementation "androidx.lifecycle:lifecycle-livedata-ktx:2.3.0-alpha03"
implementation "com.squareup.okhttp3:logging-interceptor:4.7.2"
implementation "com.squareup.okhttp3:okhttp:4.7.2"
implementation 'com.squareup.retrofit2:converter-gson:2.7.2'
implementation 'com.squareup.retrofit2:retrofit:2.7.2'
implementation "org.jetbrains.kotlinx:kotlinx-coroutines-android:1.3.7"
implementation "com.github.fingerprintjs:fingerprintjs-pro-android:v2.0"
//  Adding the Kotlin standard library as a dependency
//  does not add Kotlin support to your project nor does it
//  pose any restrictions to the language you are using.
//  This is a regular library dependency.
implementation "org.jetbrains.kotlin:kotlin-stdlib-jdk7:1.3.72"
Use the code below for versions of Android older than 5.0:
// Dependencies required by the Vesta Data Collector SDK
implementation "androidx.lifecycle:lifecycle-livedata-ktx:2.3.0-alpha03"
implementation "com.squareup.okhttp3:logging-interceptor:4.7.2"
implementation "com.squareup.okhttp3:okhttp:3.12.12"
implementation "com.squareup.retrofit2:converter-gson:2.7.2"
implementation "com.squareup.retrofit2:retrofit:2.5.0"
implementation "org.jetbrains.kotlinx:kotlinx-coroutines-android:1.3.7"
implementation "com.github.fingerprintjs:fingerprintjs-pro-android:v2.0"
// Adding the Kotlin standard library as a dependency
// does not add Kotlin support to your project nor does it
// pose any restrictions to the language you are using.
// This is a regular library dependency.
implementation "org.jetbrains.kotlin:kotlin-stdlib-jdk7:1.3.72"
If any of the dependencies listed above are already included in your project, do not include them a second time.
NOTE: These dependencies must be declared manually because the Data Collector SDK is not currently distributed as an artifact repository. The dependencies primarily support backwards compatibility. Contact Vesta if the dependencies cause problems or conflicts.
-
If you have not already set you compile options, add the
compileOptionsblock in the code below inside yourandroidblock:android { // ... compileOptions { sourceCompatibility JavaVersion.VERSION_1_8 targetCompatibility JavaVersion.VERSION_1_8 } }
Now that the SDK is included in your project, you must set it up to initialize when your app launches.
Initialize the Data Collector
Initialize the Data Collector at the beginning of your app flow so that it can report the data that it tracks to Vesta.
To initialize the Data Collector, call the VestaDataCollector.initialize() method as soon as your app launches and pass it the following parameters:
| Parameter Name | Description | Type |
|---|---|---|
application |
An instance of the current application. Call the getApplication() method from your current activity to obtain the instance. |
android.app.Application |
accountName |
Your company’s Vesta account name, which can be provided by a Customer Success representative. | String |
region |
The primary region where your application will be used: either US, or APAC. |
com.Vesta.sdk.Region |
sandboxEnabled |
Set this parameter to true for development and testing, and false for production deployments. |
Boolean |
The code below provides and example of how to initialize the data collector using the VestaDataCollector.initialize() method:
// Initialize the VestaDataCollector SDK during your main Activity's creation
VestaDataCollector.initialize(getApplication(), <AccountName>, Region.US, true, sessionKey -> {
   if (!sessionKey.isEmpty()){
       System.out.println("Datacollector service initialized successfully.");
   }
});
The call will return a sessionKey whether the initialization was successful or not. An empty sessionKey means something failed in the process of initializing the DataCollector framework, if the problem persists (keep getting empty), please contact Vesta for support.
| Parameter Name | Description | Type |
|---|---|---|
| SessionKey | The sessionKey is sent by Vesta’s backend and will be used by the server for downstream API calls. | String |
You must initialize the DataCollector SDK at the beginning of your app flow for it to be able to report the data being tracked.
Provide Location Data
If you choose to track your customer’s location, use the VestaDataCollector.sendLocationData() method to send the latitude and longitude values from your user’s device to Vesta. Vesta uses the location data to augment our fraud detection and risk analysis. Tracking location data is optional. If you choose not to track location, proceed to the Implement Field Tagging section.
The table below defines the parameters that you must pass to the VestaDataCollector.sendLocationData() method:
| Parameter Name | Description | Type |
|---|---|---|
| latitude | The latitude value obtained from your customer’s device. | Double |
| longitude | The longitude value obtained from your customer’s device. | Double |
The code below provides and example of how to call the sendLocationData() method:
VestaDataCollector.sendLocationData(37.4219999, -122.0862515);
Implement User Tracking
Use field tagging to identify the UI elements that Vesta will watch to track your customer’s behavior. See the Data Collector Integrations page for additional details about field tagging. The sections below describe how to implement field tagging for the following elements of your Android app: text fields, buttons, spinners, screen activity.
There are two ways to implement tracking: in your XML layout files, and programmatically during application initialization.
XML Layout Files
Add tracking elements to the ConstrainLayout elements of your layout XML files as described below:
- When defining UI elements in your application’s layout XML files, use Vesta’s Tracking classes instead of the standard Android UI elements classes. For example, add a
TrackingEditTextelement instead of a standardEditTextelement. - Add the property
app:tracking_tagto the object definition and assign one of the Vesta-defined values for field tagging.
Programmatically
In your OnCreate method, search for the appropriate field and assign the correct field tagging values to the object’s attributes.
Implementation Examples
The sections below provide examples of how to implement tracking on different elements of your app using XML layout files and programmatically.
Text Fields
Track when and how your customers edit text fields by using your XML layouts or code to tag the text entry fields in your app.
XML Layouts
The information below describes how to implement text field tracking in your Android app:
- When defining UI elements in your application’s layout XML files, use Vesta’s
TrackingEditTextclass instead of the standardEditTextclass. - Add the property
app:tracking_tagto theTrackingEditTextobject definition and assign one of the Vesta-defined values for field tagging.
The code below shows an example of the TrackingEditText object with the app:tracking_tag attribute value set to LoginID:
<?xml version="1.0" encoding="utf-8"?>
<androidx.constraintlayout.widget.ConstraintLayout xmlns:android="http://schemas.android.com/apk/res/android"
    xmlns:app="http://schemas.android.com/apk/res-auto"
    android:layout_width="match_parent"
    android:layout_height="match_parent">

    <com.vesta.sdk.widget.TrackingEditText
        android:id="@+id/emailEditText"
        app:tracking_tag="LoginID" />

</androidx.constraintlayout.widget.ConstraintLayout>
Programmatically
Add TrackingEditText objects to your UI programmatically by searching for the appropriate field and assigning the correct values to the object’s attributes. The code below provides an example of implementing field tagging programmatically:
@ Override
protected void onCreate(Bundle savedInstanceState) {
   super.onCreate(savedInstanceState);
   setContentView(R.layout.activity_main);
   // Initialize the VestaDataCollector SDK
   VestaDataCollector.init(getBaseContext(), getApplication(), "login id of the user");
   // Create the TrackingEditText with code
   TrackingEditText trackingEditTextPassword = new TrackingEditText(this, TrackingTag.Password);
}
Buttons
Track button taps in your app by using your XML layouts or code to tag the button elements.
XML Layouts
The tracking button actions work by using the class TrackingButton in your layout XML files, as shown in the example code below:
<?xml version="1.0" encoding="utf-8"?>
	< androidx.constraintlayout.widget.ConstraintLayout xmlns:android="http://schemas.android.com/apk/res/android" xmlns:app="http://schemas.android.com/apk/res-auto" android:layout_width="match_parent" android:layout_height="match_parent">
		< com.vesta.sdk.widget.TrackingButtonandroid:id="@+id/trackingButton" android:text="@string/track" app:tracking_action="LoginAttempt"/>
	</androidx.constraintlayout.widget.ConstraintLayout>
Programmatically
Create an instance of the TrackingButton to create tracked button elements programmatically:
 @ Override
protected void onCreate(Bundle savedInstanceState) {
   super.onCreate(savedInstanceState);
   setContentView(R.layout.activity_main);
   // Initialize the VestaDataCollector SDK
   VestaDataCollector.init(getBaseContext(), getApplication(), "login
      id of the user");
   // This is the way to initialize the Tracking button with code
   TrackingButton trackingButton = new TrackingButton(this,
         ButtonTrackingAction.LoginAttempt);
}
Spinners
Use the tracking spinner to track customer behavior across multiple screens in your app.
XML Layouts
The tracking spinner actions work by using the class AppCompatSpinner in your layout XML files, as shown in the example below:
<? xml version="1.0" encoding="utf-8" ?>
<androidx.constraintlayout.widget.ConstraintLayout xmlns:android="
http://schemas.android.com/apk/res/android" xmlns:app="http://schemas.android.com/apk/res-auto" android:layout_width="match_parent" android:layout_height="match_parent">
	<com.vesta.sdk.widget.TrackingSpinner android:id="@+id/trackingSpinner" app:spinner_tracking_tag="PurchaseCardExpirationDateMonth"/>
</androidx.constraintlayout.widget.ConstraintLayout>
Programmatically
Create an instance of the TrackingSpinner to create tracked button elements programmatically:
 @ Override
protected void onCreate(Bundle savedInstanceState) {
   super.onCreate(savedInstanceState);
   setContentView(R.layout.activity_main);
   // Initialize the VestaDataCollector SDK
   VestaDataCollector.init(getBaseContext(), getApplication(), "login
      id of the user");
   // This is the way to initialize the Tracking button with code
   TrackingSpinner spinner = new TrackingSpinner(this, TrackingTag.
         PurchaseCardExpirationDateYear);
}
Screen Activity
Screen tracking lets you track the user navigation and duration in any specific screen (activity/fragment) automatically; it will tell you when the user enters and leaves the screen. You can integrate with screen tracking in two ways: either subclassing the abstract tracking classes or by implementing the tracking interface and explicitly calling tracking implementation methods.
Subclassing the abstract tracking class
Follow the steps below to subclass the abstract tracking class and use it to track a user:
- Subclass your activity from
TrackingActivity. - Override the
getScreenTagfunction and return a value defined in the TrackingTag.java enum. Not doing so will cause a build time error.
The code below shows and example of subclassing the abstract tracking class and returning the value as described in the steps above:
import com.vesta.sdk.TrackingActivity;
public class MainActivity extends TrackingActivity {
    @ NotNull
    @ Override
   public ScreenTag getScreenTag() {
      return ScreenTag.Login;
   }
}
Implementing the tracking interface
Follow the steps below to track screen activity by subclassing TrackingFragment:
- Subclass your fragment from
TrackingFragment. - Override the
getScreenTagfunction and return a value defined in the TrackingTag.java enum. Not doing so will cause a build time error.
The code below shows and example of subclassing the abstract tracking class and returning the value as described in the steps above:
import com.vesta.sdk.TrackingFragment;
public class LoginFragment extends TrackingFragment {
    @ NotNull
    @ Override
   public ScreenTag getScreenTag() {
      return ScreenTag.Login;
   }
}
Explicit implementation
In cases where you cannot subclass Activity or Fragment, follow the steps below to weave the tracking logic into the Activity and Fragment classes in your app:
VestaDataCollectorActivitiyTracker interface
- Implement the
VestaDataCollectorActivityTrackerinterface in yourActivitysubclass. - Create a private instance of the
TrackingActivityImplthat implements the VestaDataCollector tracking logic. - Override the
getScreenTagfunction and return a value defined in theTrackingTag.javaenum. Not doing so will cause a build time error. - Override the
Activity.onCreate()method where you will callsuper.onCreate()and theonCreate(this)method provided by the privateTrackingActivityImplinstance. - Override the
Activity.onDestroy()method where you will callsuper.onDestroy()and theonDestroy(this)method provided by the privateTrackingActivityImplinstance. - Override the
Activity.onStart()method where you will callsuper.onStart()and theonStart(this)method provided by the privateTrackingActivityImplinstance. - Override the
Activity.onStop()method where you will callsuper.onStop()and theonStop(this)method provided by the privateTrackingActivityImplinstance.
The code below illustrates how to implement the steps above:
import com.vesta.sdk.VestaDataCollectorActivityTracker;
import com.vesta.sdk.TrackingActivityImpl;
public class MyActivity extends Activity implements VestaDataCollectorActivityTracker {
   private TrackingActivityImpl trackingActivityImpl = new TrackingActivityImpl();
    @ NotNull
    @ Override
   public ScreenTag getScreenTag() {
      return ScreenTag.Login;
   }
    @ Override
   public void onCreate(Bundle savedInstanceState) {
      super.onCreate(savedInstanceState);
      trackingActivityImpl.onCreate(this);
   }
   /* your own override implementation might go here */
    @ Override
   public void onDestroy() {
      super.onDestroy();
      trackingActivityImpl.onDestroy(this);
   }
   /* your own override implementation might go here */
    @ Override
   public void onStart() {
      super.onStart();
      trackingActivityImpl.onStart(this);
      /* your own override implementation might go here */
   }
}
 @ Override
public void onStop() {
   super.onStop();
   trackingActivityImpl.onStop(this);
}
/* your own override implementation might go here */
VestaDataCollectorFragmentTracker interface
- Implement the
VestaDataCollectorFragmentTrackerinterface in yourFragmentsubclass. - Create a private instance of the
TrackingFragmentImplthat implements the VestaDataCollector tracking logic. - Override the
getScreenTagfunction and return a value defined in theTrackingTag.javaenum. Not doing so will cause a build time error. - Override the
Activity.onResume()method where you will callsuper.onResume()and theonResume(this)method provided by the privateTrackingFragmentImplinstance. - Override the
Activity.onPause()method where you will callsuper.onPause()and theonPause(this)method provided by the privateTrackingFragmentImplinstance. - Override the
Activity.onStop()method where you will callsuper.onStop()and theonStop(this)method provided by the privateTrackingFragmentImplinstance.
The code below illustrates how to implement the steps above:
import com.vesta.sdk.VestaDataCollectorFragmentTracker;
import com.vesta.sdk.TrackingFragmentImpl;
public class MyFragment extends Fragment implements VestaDataCollectorFragmentTracker {
   private TrackingFragmentImpl trackingFragmentImpl = new TrackingFragmentImpl();
    @ NotNull
    @ Override
   public ScreenTag getScreenTag() {
      return ScreenTag.Login;
   }
    @ Override
   public void onResume() {
      super.onResume();
      trackingFragmentImpl.onResume(this);
   }
   /* your own override implementation might go here */
    @ Override
   public void onPause() {
      super.onPause();
      trackingFragmentImpl.onPause(this);
   }
   /* your own override implementation might go here */
    @ Override
   public void onStop() {
      super.onStop();
      trackingFragmentImpl.onStop(this);
   }
}
/* your own override implementation might go here */